Ww Greener Shotguns Serial Numbers
- 9 Comments!
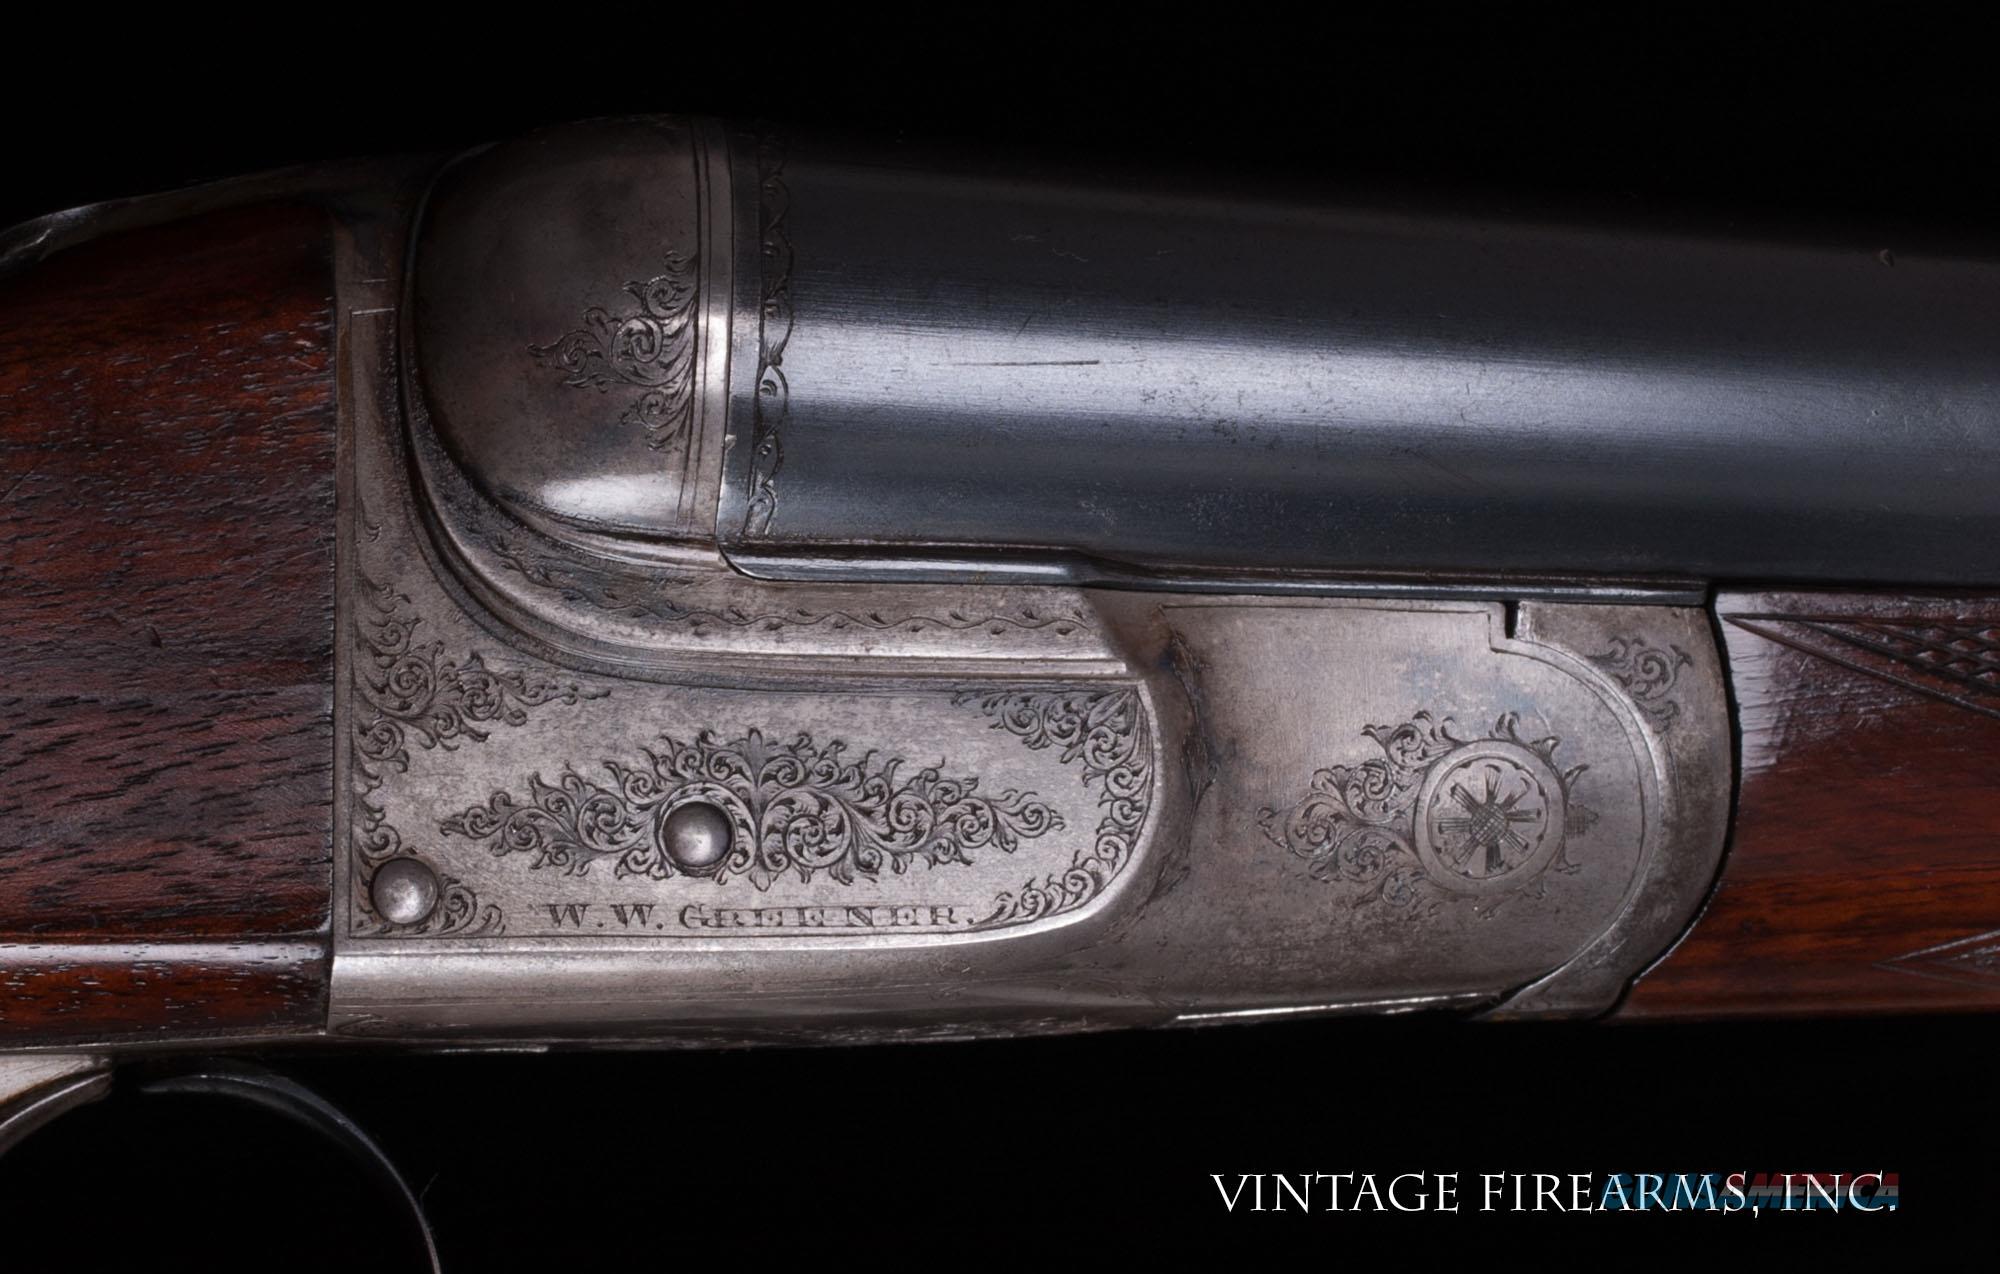
Greener, GP, martini antion shotgun W.W.Greener's Martini-actioned GP shotgun. General notes, Before you start.
Jun 02, 2012 According to Greeners book the exact number of GP shotguns made is impossible to be determined as the serial numbers of these shotguns were not recorded untill 1968. (serial number 417XX) by W. Greener of England. 44,000 of these went to Egypt (serial numbers 1001 through 45000), and the subsequent 15,846 went to colonial police.
Take care when working on any firearm. Only repair your own guns if you know what you are doing. Otherwise take them to a competent gunsmith for repairs to be carried out. I will on no account be liable for your actions, this information is supplied for Information only. And is copyright (c) 2006-2016 S.Bluck.
First get yourself a good space to work in, free from children and pets. Find some good parallel sided turnscrews, a brass or soft-faced drift/punch of about 3/16 of an inch Dia, some oil, a small hammer, and lint-free rag. I usually make sure I have some de-greaser handy too. I use isopropol alcohol, although methylated spirits can be used. Sometimes an old toothbrush is handy for reaching in-accessable parts of the action body.
If you find any worn/damaged parts, don't re-use them. Replace them. When replacing screws, Make sure the threading is clean, and do not over tighten. Finding replacement screws can be a problem, so feel the screw in rather than just grinding it in with an armfull of muscle! The above is a greener GP gun, with a full-choke barrel fitted.
The barrel below is Improved Cylinder choked, and has the same serial number as the gun and the full-choke barrel. Below that, is my greener EG police gun The martini action used for this series of shotguns is solid and generally very reliable. This one had a slight fault with the firing pin. Occasionally it would jam causing a mis-fire. The martini action can be a bit tricky to strip and re-assemble if you've not done it before, so here are a few notes and pictures to help you out. These notes are primarily for the GP, but the EG and Police Gun have the same type of action so these instructions apply to them too. To strip, clean and re-build the action Pull the lever down to open the action, Make sure the gun is empty!
Loosen the barrel locking screw, then un-screw the barrel. I take the barrel locking screw out only about half a turn, this keeps the action-body still pinched together, but allows the barrel to be un- screwed from the action easily.
Keeping the action slightly pinched together at this stage can make the removal of the trigger/extractor screw easier. Make a small paint mark on the tumbler pivot pin's head. It will fit back in better if it goes back the same way as it came out! The GP doesn't have an action-cocked indicator to show you this position. Tap out the split-pin at the breech-block's pivot-point using the brass drift, and remove the breech-block through the top of the action body usually back-end-first. Remove the trigger/extractor screw, and turn the tumbler pivot pin locking screw to the free position. Tap out the pivot-pin using a brass drift, the rest of the 'guts' with the exception of the safety lever should now be removable.
To remove the safety lever, turn the locking screw to it's free position and remove the safety lever from the action body. Be careful not to loose the detent spring and it's plunger. The action at first looks fairly complex. It's certainly more complex than many break-action guns. This picture shows the trigger group, and the breech block group assembled, Further down there are pictures of them apart. Below are a couple of pictures of the empty action.
Remove any rust, clean out any dirt and give the inside a light coat of oil. I tend to dip my finger in oil and rub/dab it onto the corners and other hard to get to places. It's a bit messier than using a rag, or squirting it on with an oil-can but it does a better job, and doesn't waste oil. Too much oil will attract the dirt, too little will allow rust and wear to take hold.

Don't forget to clean the holes for the screws and pins, including the hole for the spring and plunger for the safety lever. When the empty action is cleaned and ready lay it on a clean cloth on the bench and take a look at the other bits and pieces.
Fate hollow ataraxia save game. Trigger group. Remove the small screw holding the trigger spring in place, and remove the spring. Notice that the spring has a small lip on the end.
This lip faces upwards where it presses against the trigger. Remove the trigger pin (a long fine-pitched screw) and remove the trigger. Clean these parts as required, then re-assemble them to keep them as a group (it's harder to loose a trigger group than a tiny screw). I usually re-assemble then dry, then oil them as a group, it's far less messy that way!
Pop the re-assembled unit with the action in the 'cleaned and oiled' section of the bench! Breech Block. Give it a good wipe-over with a lint-free rag to get any dirt and old oil off. You'll need a large turnscrew to remove the stop screw from the back of the block. I have a special tool for this. Clean as required, and lay the parts on the bench as in the picture below.